Thursday, February 28, 2008
RSS: a guide to weeding the web
What is RSS and why should I care?
RSS is an acronym for several variations of the same idea. Some people take it to mean Rich Site Summary. Others like the meaning RDF Site Summary, but for the majority of users out there, it stands for Really Simple Syndication. What this all means is that sites that are RSS-enabled make it very easy for readers to check and see if a site has new content that they may want to read. If you find yourself constantly checking particular sites to see if they have anything new, then you'll realize that it saves you a lot of time to be able to track all your favorite sites in one central location rather than having to remember a bunch of URLs.
How do I start?
In order to get started in the world of RSS feeds, you will need to get what is called a news reader. The three main types are down-loadable desktop applications, browser-based programs and web-based programs that you can set up an account with.
Here are some places to look to get started.
down-loadable reader programs
browser based readers
web-based readers
Now, I'll show you a quick and easy example of how I keep track of a few sites via RSS.
I have the Firefox browser, which is the browser of choice for a LOT of designers and developers for reasons that I won't go into here because they are numerous enough to merit their own post. For our purposes today, just take a look at the patch of pink fog in the top right corner.
That little orange chicklet appears next to the URL of any site that Firefox senses is RSS feed-enabled. And since ThirstyPony is a site that is all about SEO, the site's creator has (very wisely) enabled a feed.
Since I am a big SEO geek, I want to keep checking in with TP to see if they have new stuff. So I want to click on the little orange chicklet in order to start subscribing to the site.
(As you can see from the dropdown list, there are several variations on the idea of syndicated feeds. When feeds became widely available around the turn of the century, there was a rush to create the best version and this gave rise to various "forks" in the road to RSS development.)
for extra credit read more here
Once you've chosen your RSS format, Firefox will ask where you would like to store your feed. I chose my bookmarks toolbar.
So from now on, whenever I want to keep track of what's new on Thirsty Pony, I just go to my bookmarks toolbar in Firefox and hover over the link to bring up the newest items. (now my secret's out. I'm an HP geek too)
Should my site be RSS enabled?
If you publish new content to your site with any frequency absolutely! To a user that's hip to RSS, it will make your site much more attractive since they will appreciate the fact that you have taken the effort to make your content RSS friendly.
If you want to give it a go, you can get started here
(psst! they also have RSS graphics!)
Is there anything else I should do after my site is RSS enabled?
I recommend using Feedburner to re-publish your feed to a wider audience and Marshall Kirkpatrick has written an excellent article about why.
Can I display other sites' feeds on my site?
It's not a bad idea, if you want to be a good resource for your loyal visitors. (It's considered polite to ask the other sites before you do it though.)
Friday, February 15, 2008
We interrupt this blog to bring you an important message from the BBC
While on assignment in Afghanistan with Sebastian Junger for Vanity Fair, Tim Hetherington took this photo of an exhausted US soldier in a bunker in the Korengal Valley. This photo won the World Press Photo of the Year award. There's also a great photo essay linked to the article.
We interrupt this blog to bring you an important message from the BBC
Thursday, February 14, 2008
Most Ironic Link of the Week
In an article about how to use advertising on a Wordpress site, someone created a link for Adbrite's service, but left out the "d" in the url. The reader is taken to a "splash page" for a Texas metal finishing company's site that even has one of those waving American flag gifs on its homepage.
Whoopsy!
Whoopsy!
Most Ironic Link of the Week
Wednesday, February 13, 2008
Getting Photos into your Google Map
Since I'm currently working on 3 different sites that require working with Google's map feature, I've had a chance to find a few quirks in their map interface. After trying to use their instructions to insert images into a map marker pop up, I found a few workarounds.
This quick tutorial assumes three things: 1) That you have a Google account. 2) That you have a map already created and saved into your "My Maps" on Google. 3) That you have set up a Google Picasa account.
I also recommend using a browsing program that allows you to open up multiple tabs since you will need to click back and forth between tabs.
The Google Picasa/Map method:
Step 1: In your image editing program, create an image that is at least 144 pixels wide.
Save on your computer as a jpg image. Make a note of its measurements in pixels for Step 8.
Step 2: On the web, go to your Google account and on the home page, go to More>Photos. On your Picasa page, select New Album on the right.
Step 3: Upload your jpg image. Then go back to your album and click on the image. After the image loads into its own page, you will see a link entitled "link to this image" in the 4th box down on the right. Click on it.
Step 4: Choose the "HTML to embed in website" option by clicking in the text box. This will highlight the code. Go to the top toolbar in your browser and under Edit click Copy.
Step 5: Now open a new tab in your browser (File>New Tab), and go to your Google homepage again. Click on Maps in the upper left corner of the page. Once that page opens, go to My Maps and select the map that you have created and saved.
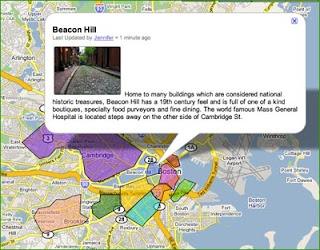
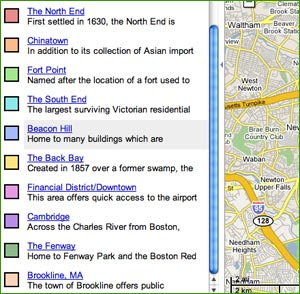
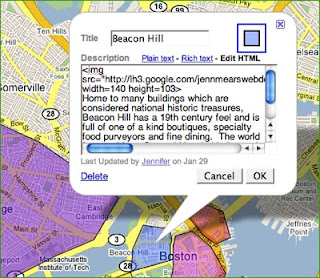
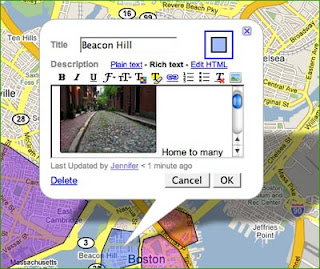
Step 6: Once the map you want to work on is loaded into the window on the right, Click on the Edit button. This will enable you to make changes to your map. With your map in Edit mode, click on an area or marker to edit its contents.(see image below for example)
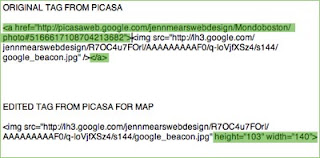
Step 7: Here's the fun part! Switch to edit HTML and click at the top of the window to place the cursor there. Then, go to the top toolbar again and hit Edit > Paste. This will paste the URL that you copied from your Picasa page. You actually only need part of the pasted code. You will need to find the part that says img src= and delete the code that comes before it.(see the example code below for this and the next step)
Step 8: After you have deleted the a href tag, go to the end of the pasted code and delete the closing tag. (). Then, directly after the URL of the image in the remaining code, but before the closing bracket (>), type: width=(width in pixels)px height=(height in pixels)px. (see image below)
Step 9: Click Save on the left, and then click on the marker or area again. Check to make sure everything is OK by switching to the Rich Text choice in the pop-up window.
If everything looks OK, click Done.
Note: if it doesn't look right at first, make sure the code for the image reads img src="url for image" and then the width and height.
Getting Photos into your Google Map
Monday, February 11, 2008
Sunday, February 03, 2008
Wordpress Advertising-The easy way
It seems like it should be easy enough. Your client wants to put a few ads for local businesses into the sidebar of their site. So you upload an image for the ad into your "images" folder, open up your "sidebar.php" file, find out where you want the ad to show up, write some html and Voila! Hey, wait a minute, there's no image, just the "alt" tag showing through. What up?
After spending some time wading through the Wordpress forums, I found out that I should put a text widget into my sidebar. Okay, simple enough, wait! Now my entire sidebar disappeared!
I took the text1 widget out and tried looking for another solution.
If Wordpress has a weak link, it's the fact that its administrators tend to shunt most of the technical support into the forums arena. Its a nice gesture to let the community solve its own problems and it frees up their time to keep developing, but, as we all know, these online forums run the risk of being rife with misinformation and posters who forget to play nice. Long story short, after much Googling, I found a very simple solution that doesn't involve messy widgets or plugins. (Muchos gracias Lorelle and Wendy!)
Jennsweb recipe for easy Wordpress Ads
(author's note: these are simply advertising text, image and link. Therefore, they don't count clicks, or generate themselves dynamically via keywords. That is a plugin thing.)
Step 1: Create a small rectangular image to use for your ad. Save it at dimensions that will fit into your theme's sidebar. I created the image at the top of this article to be 100 pixels wide by 124 high. For consistency's sake, I save the optimized image in the "images" folder of the theme.
Step 2: Go to your site's Admin panel (dashboard) and choose Write>Post. Just write a quick title in the Title area so you will be able to find it later.
Step 3: Go down to the Upload area and browse to where you saved the image and upload it. Make sure it uploads at the full size.
Step 4: Save the post, but don't publish it.
Step 5: Go to Manage>Uploads to find the image you just uploaded. Click on the image to load its URL into the address bar.
Step 6: Highlight the image's URL and then copy it.
Step 7: Go to Presentation>Theme Editor, and select your sidebar file for editing. Find the place in the code where you would like the ad to appear. For example, I chose a place down at the end, just in front of the closing tag.
Step 8: Type in the HTML for your ad's copy and hyperlink. For the image, type in something like this:
Step 9: Now place your cursor in between the two quotation marks and paste the image's URL there.
Step 10: Click "update file" and then view your site to test the result. You may want to tweak the copy or placement a little, and that should be possible with the theme's stylesheet file.
Wordpress Advertising-The easy way
Subscribe to:
Posts (Atom)